How do you install rosette blocks?
.
Regarding this, what size should plinth blocks be?
The plinth block should always be at least 2 to 3 inches taller than the baseboard, it must be thicker than both the casing and the base. It should be 1/4 inch wider than the casing.
Secondly, what is a plinth base? A plinth is a base or platform that supports a pedestal, column, or structure. Structurally, the plinth distributes the weight and pressure coming down through a column evenly across a wider space. It can also elevate structures above the ground to protect them from water or other elements.
Besides, how do you fit plinth blocks?
Steps
- Remove the old trim. Installing plinth blocks will be easiest if there's nothing to get in the way.
- Install directly over the existing trim.
- Use adhesive to hold the blocks in place.
- Fasten the blocks.
- Finish the blocks with spackle and paint.
What is a door casing?
The trim that surrounds a door frame is called casing, and it's always installed before baseboard and chair rail because they have to butt against it. Casing is also the easiest type of molding to install because the joinery is simple, making it a perfect first project.
Related Question AnswersWhat is the molding around a door called?
Door & Window Also called casing, the trim that surrounds interior doors and windows.How do you attach a rosette to a wall?
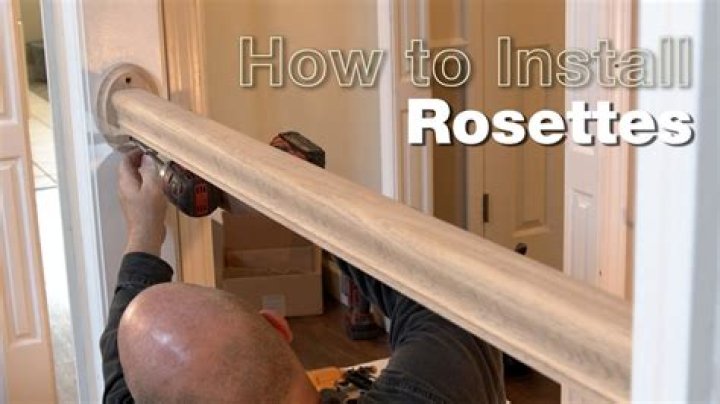
Rosettes and Brackets Drill a 1/4-inch-deep countersink at the center of each oak or pine rosette. Install a screw-tip attachment in the drill and attach each rosette by driving a 2-inch wood screw through the countersink at each set of intersecting marks on the wall.How do you cut the bottom of a door?
A circular saw makes a great door cutter. Make sure your saw blade is sharp and has a minimum of 18 teeth. Hold the circular saw against the edge of the door as if you're ready to cut. With the blade teeth held just to the waste side of the scored line, mark the masking tape along the opposite edge of the base plate.How do you fix a door trim?
- Step 1 Door Trim.
- Measure the door frame.
- Prepare to cut the new trim to fit the door.
- Align the chop saw to make a 45 degree cut.
- Align the new trim along the edge of the door.
- Using trim nails, nail the trim to the wall, starting from the top.
- A small dab of joint compound or spackling will hide the nail holes.
What is a casing block?
Pyramid. Casing block. When the pyramid was almost finished, casing blocks of white limestone were laid on top of the main pyramid blocks. Each casing block was then trimmed so that the outer surface of the pyramid would be smooth and white.What are corner blocks used for?
Corner blocks are those which are used for wall corners in particularly masonry constructions, and which increases durability when the round hole inside is filled with concrete or reinforcements.Should I use corner blocks with crown molding?
You can skip the miter and coping cuts altogether by using corner blocks, which will prevent having to cut angles into the molding. It looks professional and tends to be a lot easier.How do you nail corner molding?
Wipe the wall with a microfiber cloth to remove the sanding dust. Place the corner molding and position a pneumatic nailer so that the nail will pierce through the side of the corner molding at an angle and enter the wall within one inch of the corner, hitting a wall stud.What are corner blocks?
Corner block. Also called a trim block. A square, relatively flat block of wood, often decoratively carved, placed at the upper corners on each side of the wood framing around a door.How do you install corner trim?
Cutting Inside Corners- Measure your piece. Measure the distance between the last board end and the corner.
- Miter the ends. Miter the ends of both corner pieces at a 45° angle, with the long point on the back side, where the molding will touch the wall.
- Place the pieces.
- Nail in place.
How do you make crown molding corner blocks?
How to Make Crown Molding Corner Blocks- Cut a small piece of crown molding with a miter saw.
- Cut the 4-inch by 4-inch block of wood the length you measured in Step 1, remembering to add 2 to 3 inches.
- Choose a router bit that will create the decorative edge you want for your corner blocks.